Introduction
Today, I want to share some insights on how to enhance your portraits through editing in Lightroom. As a photographer who loves to travel and capture stunning images, I find that post-processing plays a significant role in bringing out the best in my photos. In this blog post, I will walk you through a simple Lightroom tutorial on how to apply contouring techniques to elevate your portraits.
Venti is not the Largest Size at Starbucks
So, I recently discovered that venti is not the largest size at Starbucks, which was quite a revelation for me. As basic as I may be when it comes to coffee choices, this newfound knowledge added a fun twist to my usual Starbucks routine.
Glowy AF Photos at Home
In a previous video, I shared some tips on how to achieve glowy and radiant photos at home. By incorporating techniques like using highlighter, bronzer, and even a packing cube mesh for a dewy look, you can elevate your self-portraits without fancy equipment.
Applying Makeup Techniques in Editing
Drawing inspiration from makeup contouring, I apply similar principles in my editing process. By focusing on enhancing features like eyes, lips, and skin texture, you can create a polished and natural look in your portraits.
Enhancing Eyes and Lips
One key aspect is enhancing the eyes using tools like the iris enhance brush to make them stand out and adding a subtle tint to the lips for a healthy and vibrant appearance. These small adjustments can make a significant difference in the overall look of the portrait.
Softening Skin and Removing Imperfections
Using the soften skin brush, you can blur out fine lines and shadows while retaining the natural texture of the skin. Additionally, spot removal tools help in eliminating minor imperfections without compromising the authenticity of the subject’s features.
Contouring with Light and Shadow
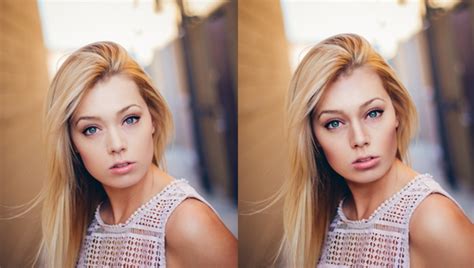
Utilizing brushes like Dodge lighten and darkening, you can contour areas of the face to add depth and dimension. Highlighting high points such as cheekbones, Cupid’s bow, and brow bones, while darkening shadowed areas, enhances facial features for a more sculpted look.
Final Touches and Before/After Comparison
By refining the contouring techniques on not just the face but also the chest and shoulders, you can create a cohesive and polished portrait. The before-and-after comparison showcases the transformative power of Lightroom editing in enhancing the overall composition of the image.
Skillshare Sponsorship and Conclusion
Lastly, I want to thank Skillshare for sponsoring this video and providing a platform for continuous learning. Whether you’re interested in honing your Lightroom skills or exploring new creative avenues, Skillshare offers a diverse range of classes to expand your knowledge. Remember, the key to mastering editing techniques lies in practice and experimentation.
Related Questions
1. How can contouring techniques in makeup be applied to editing portraits in Lightroom?
Contouring techniques in makeup, such as highlighting high points and darkening shadowed areas, can be replicated in Lightroom using tools like Dodge lighten and darkening brushes. By enhancing features like cheekbones, eyes, and lips, you can create a sculpted and polished look in portraits.
2. What are some tips for enhancing eyes and lips in portrait editing?
To enhance eyes, use tools like the iris enhance brush to make them stand out by adjusting shadows, clarity, and saturation. Adding a subtle tint to the lips with the tint brush can create a rosy and healthy appearance, contributing to a vibrant overall look in the portrait.
3. How can softening skin and removing imperfections improve portrait editing?
Softening skin with the soften skin brush helps blur out fine lines and shadows while preserving the natural skin texture. Using spot removal tools, you can eliminate minor imperfections without compromising the authenticity of the subject’s features, resulting in a more polished and refined portrait.
4. What is the significance of contouring with light and shadow in Lightroom editing?
Contouring with light and shadow in Lightroom involves highlighting high points like cheekbones, Cupid’s bow, and brow bones, while darkening shadowed areas to add depth and dimension to the face. By utilizing brushes like Dodge lighten and darkening, you can sculpt and enhance facial features for a more defined and impactful portrait.
5. How does Skillshare contribute to continuous learning and skill development in photography and editing?
Skillshare offers an online learning community with a wide range of classes covering creative and entrepreneurial skills, including photography and editing. With a Premium Membership providing unlimited access to classes, individuals can enhance their skills, explore new techniques, and further their knowledge in various creative fields, making it a valuable resource for continuous learning and skill development.